

Disk Monitoring: Check Belt#
This section describes the procedure to check the wear and cleanliness status of the FlexiBowl® belt using the Belt Check function.
What is Belt Check? Belt Check is a tool that compares the current image of the belt with a reference image of the clean belt (Clean Reference), calculating a similarity index. This allows you to monitor the level of dirt or wear on the belt over time, identifying the need for maintenance in advance.
Note
Prerequisites
Before proceeding, make sure that:
The FlexiBowl® is connected and configured (FlexiBowl® Setup)
The belt is visible and properly lit
Accessing the Check Belt page#
Step |
Description |
|---|---|
1 |
From the main page of the software, click on Setup |
2 |
On the SETUP page, locate and click on the Check Belt icon |
3 |
The belt check page opens, with one block for each FlexiBowl® managed by the system |
Check Belt interface overview#
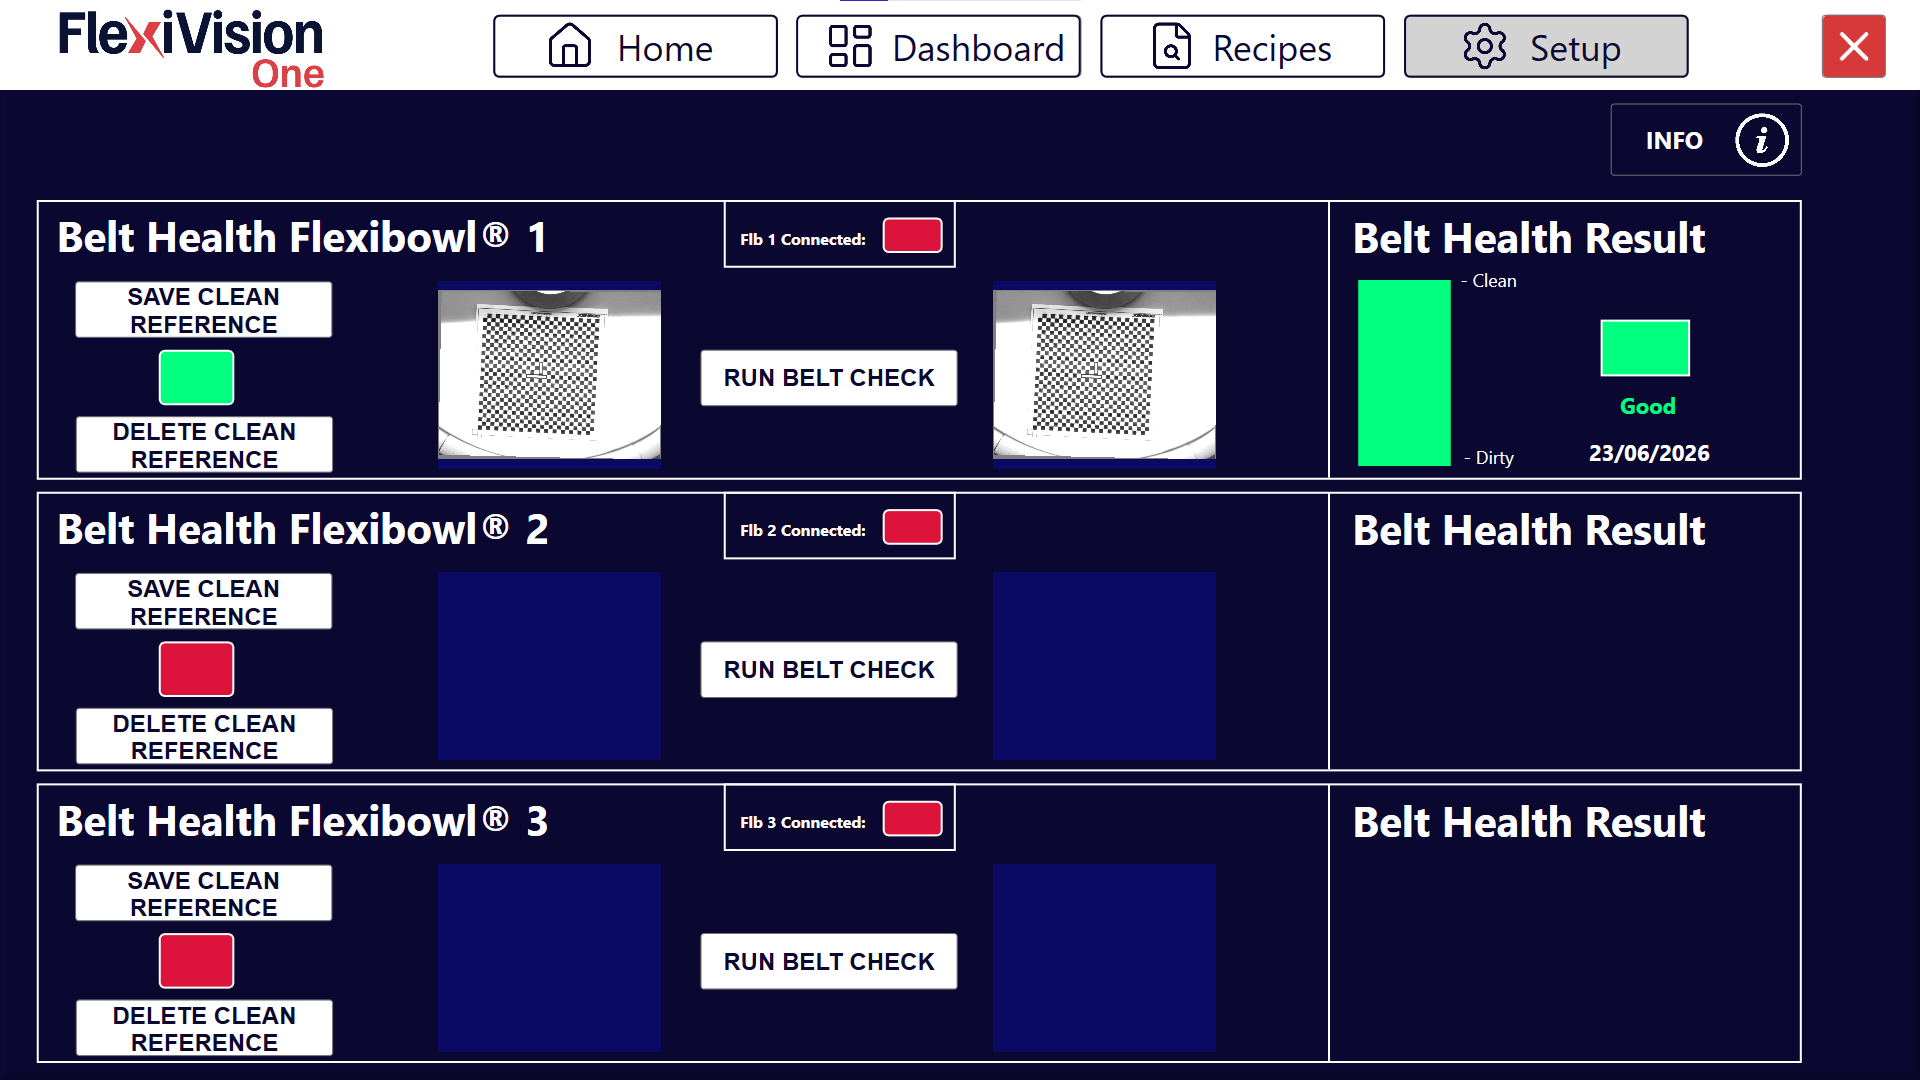
The page is divided into one block for each connected FlexiBowl®, each consisting of two sections:
Element |
Description |
|---|---|
Flb X Connected |
Connection status indicator for the corresponding FlexiBowl® (🟢 Green = connected, 🔴 Red = not connected) |
Save Clean Reference |
Captures and saves the current image of the belt as a “clean” reference, to be used as a comparison term in subsequent checks |
Delete Clean Reference |
Deletes the previously saved reference image, so a new one can be acquired |
Camera preview (before/after) |
The two thumbnails show, respectively, the saved reference image and the current image of the belt at the time of the test |
Run Belt Check |
Starts the comparison between the reference image and the current one, calculating the belt’s status |
Belt Health Result |
Panel showing the comparison result: a graduated bar Clean → Dirty, a colored indicator, a textual status, and the date of the last check |
Procedure#
Step 1: Acquiring the clean reference#
Important
Perform this step only with the belt actually clean. The accuracy of all future checks depends on the quality of this reference image.
Step |
Description |
|---|---|
1 |
Make sure the belt is clean and free of components or debris in the framed area |
2 |
Click on Save Clean Reference |
3 |
The image is captured and saved as a reference; it will appear in the left-hand thumbnail |
Tip
If the belt is replaced or thoroughly cleaned, repeat this step to update the reference.
Step 2: Running the Belt Check#
Step |
Description |
|---|---|
4 |
Click on Run Belt Check |
5 |
The system captures the current image of the belt (visible in the right-hand thumbnail) and compares it with the saved reference |
6 |
The result is displayed in the Belt Health Result panel |
Interpreting the results#
The Belt Health Result panel shows:
Element |
Meaning |
|---|---|
Graduated bar |
Visual representation of the position of the measured value between the two extremes Clean and Dirty |
Colored indicator and text |
Summary status of the belt: |
Color |
Text |
Meaning |
|---|---|---|
🟢 Green |
Good |
Belt in good condition |
🟡 Yellow |
Warning |
Belt to be monitored, possible need for cleaning soon |
🔴 Red |
Poor |
Dirty or worn belt, cleaning/maintenance intervention recommended |
Note
To be confirmed: the exact percentage thresholds that determine the transition from Good to Warning to Poor.